Do you teach your little one to know colors? A handmade cheerful caterpillar with a disassembled body is ideal for this. You can do it without a sewing machine and choose colors that will suit you. The length is up to you.

How to do it
1. Make a circle template from paper. The size is up to you. According to us, it is ideal around 10 to 15 cm.
2. According to the template, always cut out two parts from the felt in one color. If you fill with vatelín, make it into a filling in every part of the body.
3. From the remnants of the fillet, cut the eyes, the gounds and for each part also two rectacles and a semicircle of a different color to the legs. Sew the pieces of legs together.

4. You can go to work on the caterpillar even without a sewing machine. Sew the circular parts of the body with a suture stitch. You start with the part of your face. Sew eyes, mouth and nose to the cheek side of one side.
5. When you decide to make a flower on the gounds, first cut out the white flower and sew a yellow center into it. Then sew it to the gounds.
6. Sew a piece of Velcro to the center of the face side of the other part of the face part.
7. Put two parts of the face part together with the back, pin inside in the right place of the foot and the handle. When working with the vatelín, insert the piece between the filc and start stitching with an entl stitch on the machine or a bandage in your hand. If you want to fill the body with hollow fiber, sew the fillet parts and keep a gap of about 5 cm. Fill and sew.
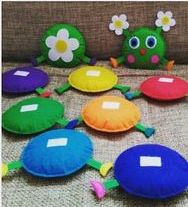
Don't forget – Mark the individual parts of the fillet exactly where your feet and Velcro will be before sewing pencil or chalk, so that the individual feet and parts will "match" you. Alternate the rough and fine part of the Velcro so that the parts of the body can be properly classified behind you.